Automating Your Workflow with Batch Processing
Editing a single image is easy, but applying the exact same adjustments—like resizing, contrast correction, or sharpening—to hundreds of photos or scanned documents can be incredibly tedious and time-consuming.
PhenoCapture AI’s Batch Processing feature is designed to save you hours of manual work. It allows you to build a custom sequence of edits and apply them automatically to an entire folder of images in one go. Whether you are prepping a massive photo album, standardizing a batch of digitized documents, or applying a specific color grade to multiple files, you can get it all done effortlessly.
💡 Key Features
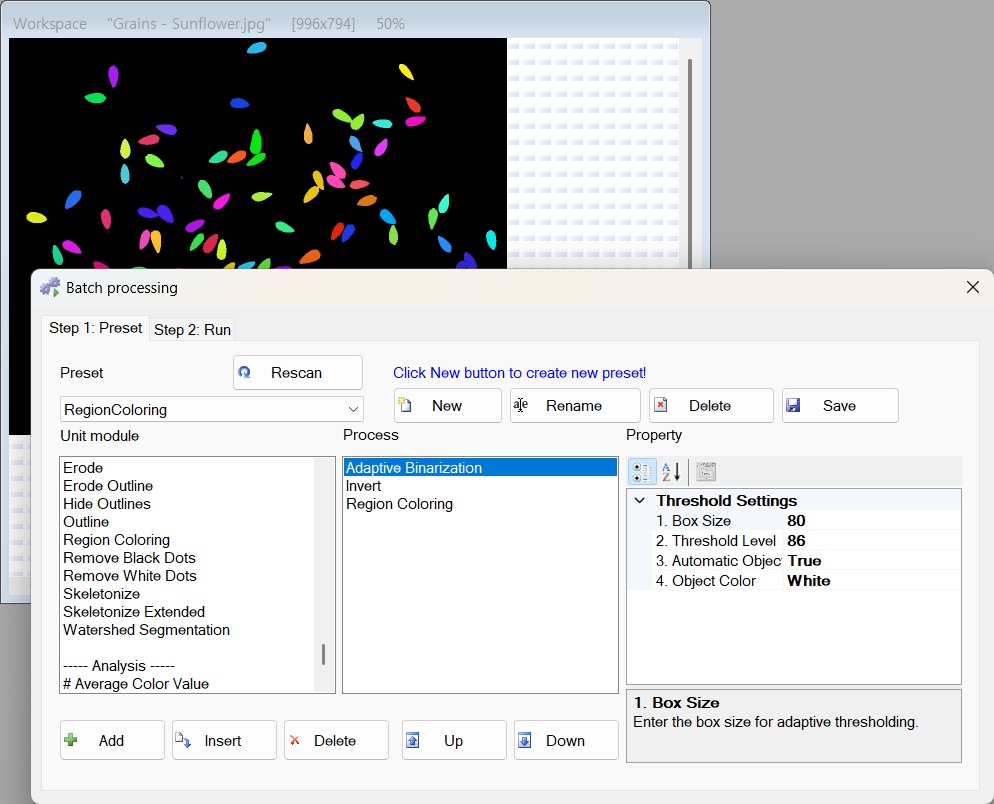
- Custom Workflow Builder: Easily mix and match different editing modules (actions) to create your perfect processing sequence. You can add, remove, and reorder steps at any time until your workflow is exactly what you need.
- Smart Presets: Once you build a useful workflow, you can save it as a custom preset. The next time you need to perform the same task, simply load your preset from the dropdown menu and start processing immediately without having to rebuild the steps.
- Flexible Image Sources: You can process the single image currently open in your workspace, selectively drag and drop specific files, or point the tool to process an entire folder on your computer.
- Data Export & Text Logging: If your workflow includes data extraction steps (such as reading specific color values across multiple regions), the Batch Processing tool can automatically compile those results and save them as a clean, organized CSV or Text file for easy viewing in spreadsheet software.
- Full Control Over Execution: You can track the progress of every single file in real-time through the progress log. Need to step away or check on something? You can safely pause, resume, or stop the batch job at any moment.
🛠️ How to Use Batch Processing
Setting up your automated workflow is highly intuitive. Just follow these steps:
Step 1: Choose Your Image Source
Start by selecting where your images are coming from. Use the source dropdown menu at the top to choose between your current workspace, a custom folder on your PC, or simply drag and drop the exact files you want to edit.
Step 2: Build Your Action List
On the left side of the window, you will see a list of all available editing tools, neatly categorized by their function (e.g., Color, Edit, Image).
- Double-click an action (or select it and use the [Add] button) to move it to your active processing list on the right.
- Use the [Up] and [Down] buttons to arrange the actions in the exact chronological order they should be applied to your images.
- Click on any action in your active list to adjust its specific settings in the properties panel below.
Step 3: Save Your Preset (Optional but Recommended)
If you plan on using this exact editing sequence again in the future, click the [New] button in the preset area. Give it a memorable name, and PhenoCapture AI will save your entire workflow. You can easily rename, update, or delete your saved presets later as your needs change.
Step 4: Run the Batch Job
If you want the tool to save a text file of any extracted data, make sure to set your preferred save location using the text file settings.
Once everything is ready, hit the [Start] button. You can sit back and watch the real-time progress log as PhenoCapture AI automatically applies your customized edits to every single image in your queue!
With Batch Processing, handling large-scale image edits goes from being an all-day chore to a task completed in minutes.