✨ A Complete Guide to Magnetic Snap & Auto-Routing
PhenoCapture AI’s Magnetic Snap and Auto-Routing features are designed to make drawing complex, freehand paths and polygonal selections easier and more precise than ever. Instead of meticulously clicking every single point along a border, these intelligent tools automatically detect object edges and perfectly hug their contours as you trace!
Whether you are isolating a highly detailed biological sample or selecting an intricate shape, these customizable settings do the heavy lifting for you.
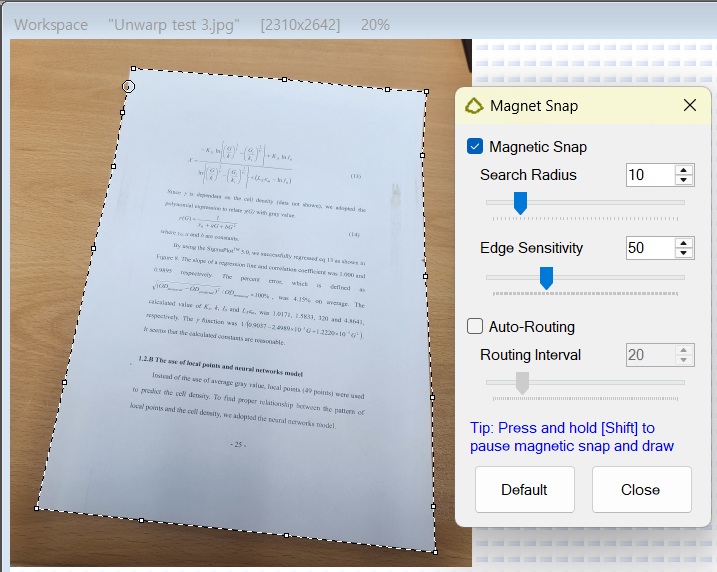
💡 Key Features
- Magnetic Snap: Like a digital magnet, your selection line will automatically pull and snap to the nearest visible edge or boundary of the object you are tracing. This guarantees a pixel-perfect selection even if your hand movements are slightly off the mark.
- Adjustable Radius & Sensitivity: You have total control over the magnetic attraction!
- Search Radius: Defines how far the tool reaches out to look for an edge. Keep it small for cluttered areas, or expand it for clean, isolated objects.
- Edge Sensitivity: Controls how strictly the tool reacts to contrast changes. Increase this for faint shapes, or lower it to ignore background noise.
- Auto-Routing (Hands-Free Point Placement): When enabled alongside Magnetic Snap, PhenoCapture AI will automatically drop anchor points along the edge as you drag your mouse. You don’t even need to constantly click—just guide your cursor along the boundary, and the software builds the path for you!
- Customizable Auto-Routing Intervals: You can easily adjust the spacing distance between automatically placed points. Set a tight interval for capturing sharp, highly curved corners, or widen the interval for faster tracing along long, straight edges.
- Quick Default Reset: Experimented a bit too much with the sliders? A simple “Default” button instantly resets all radius, sensitivity, and interval settings back to their optimally balanced factory values.
🛠️ How to Use Magnetic Snap & Auto-Routing
Step 1: Select Your Tracing Tool
Ensure your image is loaded into the main workspace, then activate either the Path or Polygon selection tool from your advanced selection menu.
Step 2: Configure Your Magnetic Settings
Open the tool settings window to turn on Magnetic Snap.
- Adjust the Radius and Sensitivity sliders based on how clear the edges of your object are.
- If you want to avoid clicking manually, check the box to enable Auto-Routing and set your preferred point interval.
Step 3: Trace Your Object
Click once on the boundary of your subject to drop the first point. As you move your mouse along the object’s perimeter, watch as the selection dynamically snaps to the exact edges. If Auto-Routing is enabled, just smoothly guide your cursor and watch the path build itself!