🎬 A Complete Guide to Video Encoder to Create Video or Animated Gif File from Images
PhenoCapture AI’s Video Encoder is a powerful yet easy-to-use tool that allows you to stitch a sequence of images into a smooth video file or a fun animated GIF. Whether you want to turn a folder of photos—such as those gathered using our Time-Lapse Capture tool—into an MP4 video or convert a burst of images into a looping GIF, this feature makes the entire process incredibly simple.
Here is everything you need to know about transforming your image collections into dynamic videos.
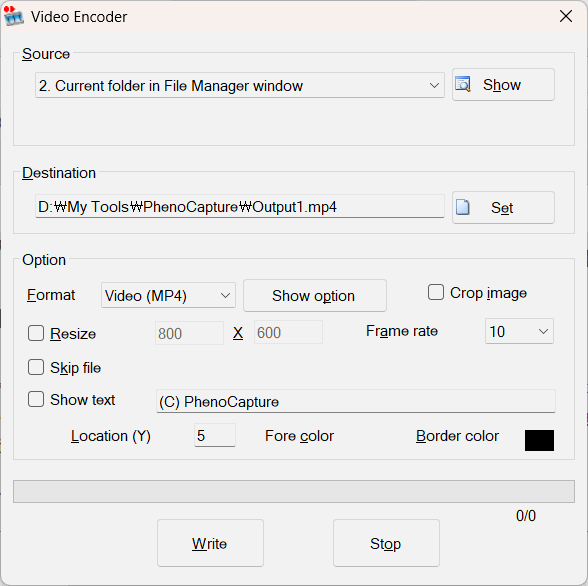
💡 Key Features
- Multiple Output Formats: Choose exactly how you want your final video saved. You can export a modern, high-quality MP4, a classic WMV video, or an Animated GIF for easy web sharing.
- Flexible Image Sourcing: The tool allows you to pull image frames from various sources. You can use photos dragged into the file box, a specific folder on your hard drive, or the active file manager window.
- Smart Framing & Resizing: Easily adjust the output video to the perfect size. You can automatically crop the images using a pre-drawn rectangle on your workspace, or type in specific dimensions to resize everything uniformly before encoding.
- Frame Skipping & Text Animation: Save time and control your video’s speed by automatically skipping a set number of frames. You can also add sleek, sliding text animations across the screen during the video to serve as a watermark or title!
🛠️ How to Use the Video Encoder
Creating your video from a series of images takes just a few clicks. Follow these steps:
Step 1: Choose Your Images
Select the source folder containing the images you want to turn into a video. You can drag and drop files into the designated box, or point the tool to a specific folder on your computer.
Step 2: Select the Output Format
Choose whether you want the final file to be an MP4 Video, WMV Video, or an Animated GIF.
- If you select a video format (MP4 or WMV), the Encoding Options button will appear, allowing you to fine-tune the bitrate, profile, and video quality for the best results.
Step 3: Set Your Location and Speed
Click the Destination button to choose where on your computer the final video file will be saved. Next, adjust the Frame Rate (FPS) to decide how fast the video will play. A higher number means a faster, smoother video.
Step 4: Add Adjustments (Optional)
If you need to resize the final video, check the Resize box and enter the width and height you need. (Note: For standard video formats, it is recommended to use even numbers for the dimensions to ensure the best quality). If you want to skip images to make a time-lapse play faster, enable the Skip File option.
Step 5: Start Encoding
Once everything is set, simply click Start. The tool will automatically grab your images in order, stitch them together, and produce your final video or GIF file. You can monitor the progress bar, and you will be notified as soon as it’s done!
With the Video Encoder, turning hundreds of still photos into a beautiful, shareable video or GIF is completely effortless! It serves as the perfect companion to the Time-Lapse Capture feature, seamlessly bringing your automated image sequences to life.