✨ A Complete Guide to the Create Selection from Binary Image Tool
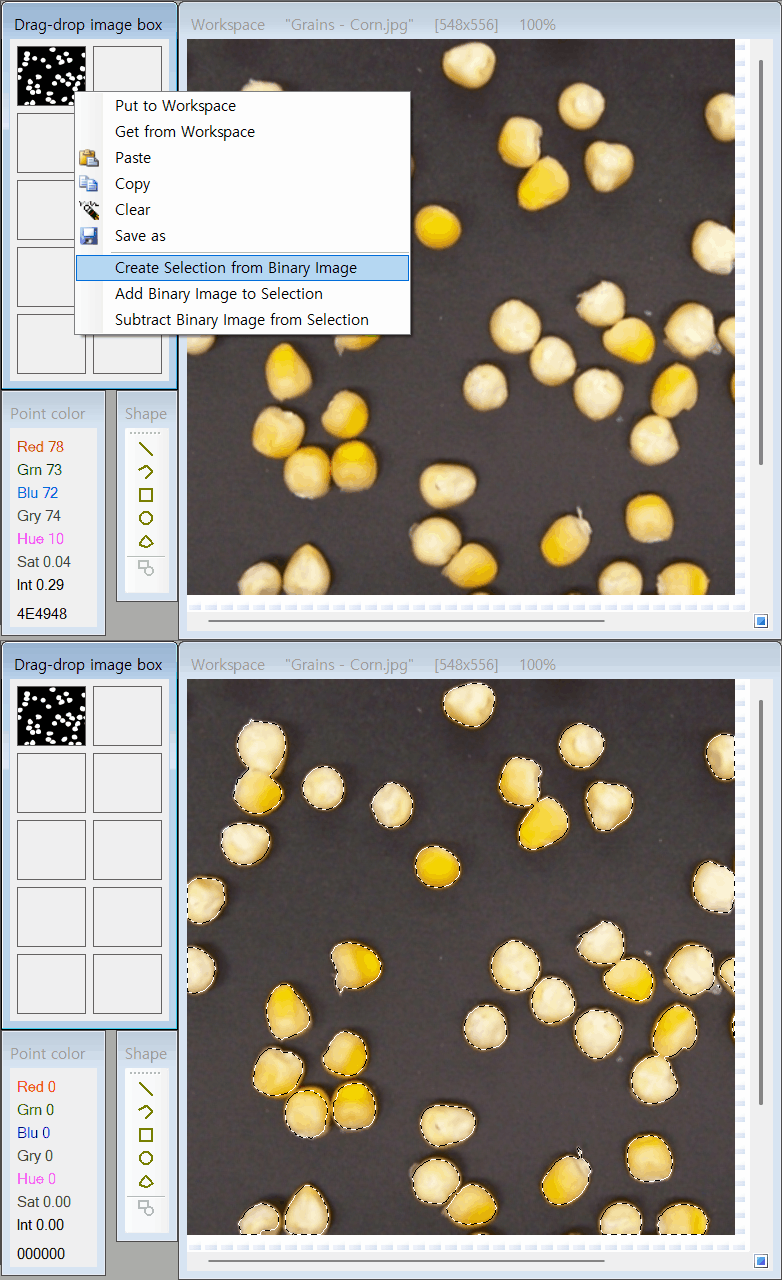
PhenoCapture AI’s Create Selection from Binary Image tool allows you to instantly convert any black-and-white (binary) image directly into an active, highly accurate selection mask. This is incredibly useful when you have pre-computed masks or thresholded binary images, and you want to use their exact shapes to isolate regions on another image.
💡 Key Features
- Direct Mask Conversion: The algorithm automatically scans your binary image and converts all white pixels into an active selection region, perfectly tracing the shapes while ignoring the black background.
- Multiple Image Sources: You can generate a selection directly from the main workspace image, or conveniently pull a binary image from any of your Drag & Drop Image Box slots (slots 1 through 10) to apply it as a mask.
- Smart Binary Validation: The tool intelligently checks if your target image is a strict binary image before processing. If it detects grayscale or color data, it provides a helpful warning—but still gives you the ultimate control to proceed if you choose to do so.
- High-Speed Optimization: Instead of blindly processing the entire canvas, the engine first rapidly scans for the outermost boundaries of your white pixels. It then safely confines the mask generation to that specific localized area, saving massive amounts of processing time.
- Built-in Safety Timeout: Extremely complex mask conversions are monitored by a strict 1-second safety timer. If an operation is too heavy and risks freezing your workspace, the tool will safely abort the process and notify you, keeping your application responsive.
- Seamless Undo Integration: Just like all selection tools in PhenoCapture AI, the newly created binary mask is recorded in the undo engine, allowing you to instantly revert if you select the wrong source image.
🛠️ How to Use the Tool
Step 1: Prepare Your Binary Image
Ensure you have a binary (black-and-white) image ready. This can be loaded directly into your main workspace, or it can be stored in one of the numbered slots in your Drag & Drop Image Box.
Step 2: Execute the Conversion
Navigate to your selection menu and click Create Selection from Workspace Binary Image (or select the option corresponding to your specific Drag & Drop slot).
Note: If the software detects that your image isn’t perfectly black and white, it will prompt you with a warning. You can click “Yes” to force the conversion anyway.
Step 3: Utilize Your New Selection
The software will rapidly scan the target image, locate all the white regions, and instantly generate an active selection mask wrapping those exact shapes. You can now use this precise selection for your next editing, analysis, or composite steps!