Mastering Adaptive Contrast in PhenoCapture AI
Have you ever taken a photo where the sky is perfectly exposed, but the foreground is completely hidden in shadows? Or perhaps you scanned a document where the lighting was uneven across the page? Standard contrast sliders often fail in these situations because they adjust the entire image equally—ruining one part of the picture while trying to fix another.
PhenoCapture AI’s Adaptive Contrast feature solves this problem. Instead of applying a single adjustment to the whole picture, it intelligently divides your image into smaller sections and enhances the contrast locally based on the unique lighting of each area. This brings out hidden details in dark shadows while protecting bright highlights from being washed out.
Whether you are enhancing landscape photography, recovering details in underexposed portraits, or clarifying shadowed documents, Adaptive Contrast gives your images a professional, balanced look.
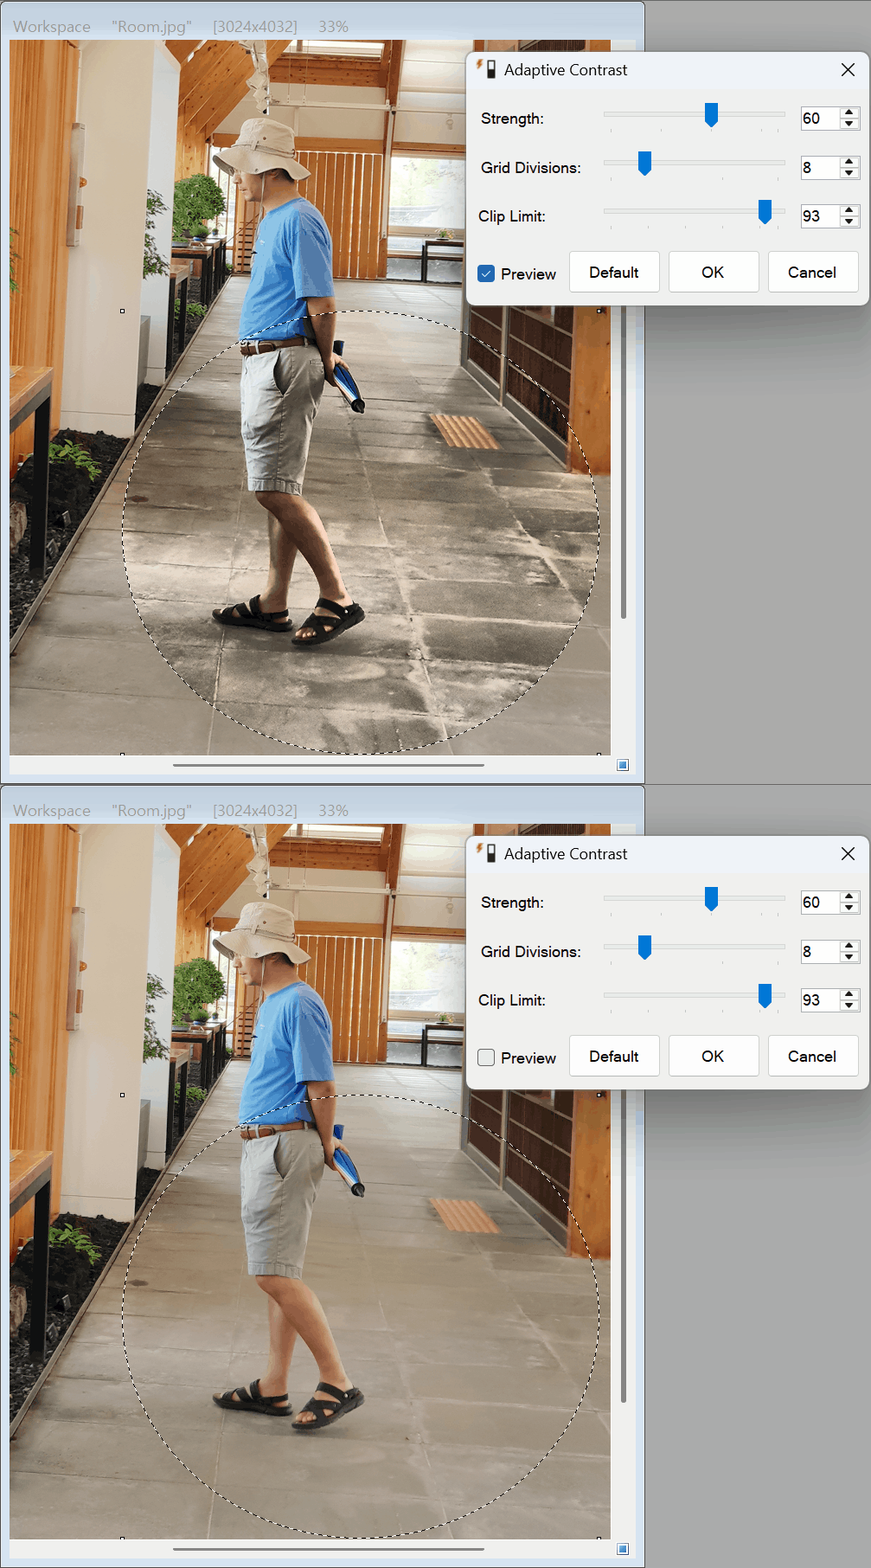
💡 Key Settings Explained
The Adaptive Contrast tool offers precise control over how the enhancement is applied. You can easily adjust these settings using the sliders or by typing specific numbers.
- Grid Divisions (2 – 32): This setting tells the software how many sections (tiles) to divide your image into for analysis.
- A lower number (e.g., 4 or 8) divides the image into larger chunks, producing a more natural, subtle improvement.
- A higher number (e.g., 16 or 32) creates a finer grid, which is excellent for bringing out micro-textures and highly intricate details, but can sometimes look less natural if pushed too far.
- Clip Limit (10 – 100): When you increase local contrast, flat areas like clear blue skies or smooth walls can sometimes become noisy or grainy. The Clip Limit acts as a safety net. It limits the maximum amount of contrast boost applied to any single area, preventing ugly noise and “halo” effects around objects.
- Strength (0 – 100%): Once you have set your grid and clip limit, the Strength slider controls the overall intensity of the final effect. You can dial it back if the enhancement feels too strong, allowing you to blend the perfect amount of clarity into your original image.
🛠️ How to Use Adaptive Contrast
Applying this powerful effect is quick and straightforward thanks to the real-time processing engine.
Step 1: Enable the Live Preview
When you open the Adaptive Contrast tool, first check the Preview box. PhenoCapture AI features an ultra-fast, zoom-aware preview engine. This means that as you move sliders, you will see the exact results instantly on your screen, even if you are zoomed in to check fine details or panning across the image.
Step 2: Adjust the Grid and Clip Limit
Start by adjusting the Grid Divisions. Watch how the details in the darkest and brightest areas of your image start to emerge. Next, tweak the Clip Limit. If you notice smooth backgrounds becoming grainy, simply lower the Clip Limit until the noise disappears while keeping the details sharp.
Step 3: Fine-tune the Strength
Use the Strength slider to decide how dramatic you want the final result to be. If you ever feel like you have gone too far and want to start over, you can always click the [Default] button to instantly reset all sliders to their recommended starting values.
Step 4: Apply the Effect
Once you are completely satisfied with how the image looks in the workspace, click the [OK] button. The Adaptive Contrast will be permanently applied to your image, giving you a perfectly balanced, highly detailed result.
(Tip: If you change your mind during the process, clicking [Cancel] or pressing the Escape key will safely close the tool without altering your original image.)
With PhenoCapture AI’s Adaptive Contrast, rescuing poorly lit photos and revealing hidden textures is easier than ever. Try experimenting with different grid sizes to see just how much detail you can bring back to life!