✂️ Crop and Export Regions: Seamlessly Extract Image Data
When working with complex images, you often need to isolate and save specific objects or areas for individual analysis. PhenoCapture AI’s Crop and Export Regions tool automates this process by using a binary mask to identify distinct regions and instantly exporting them as separate image files.
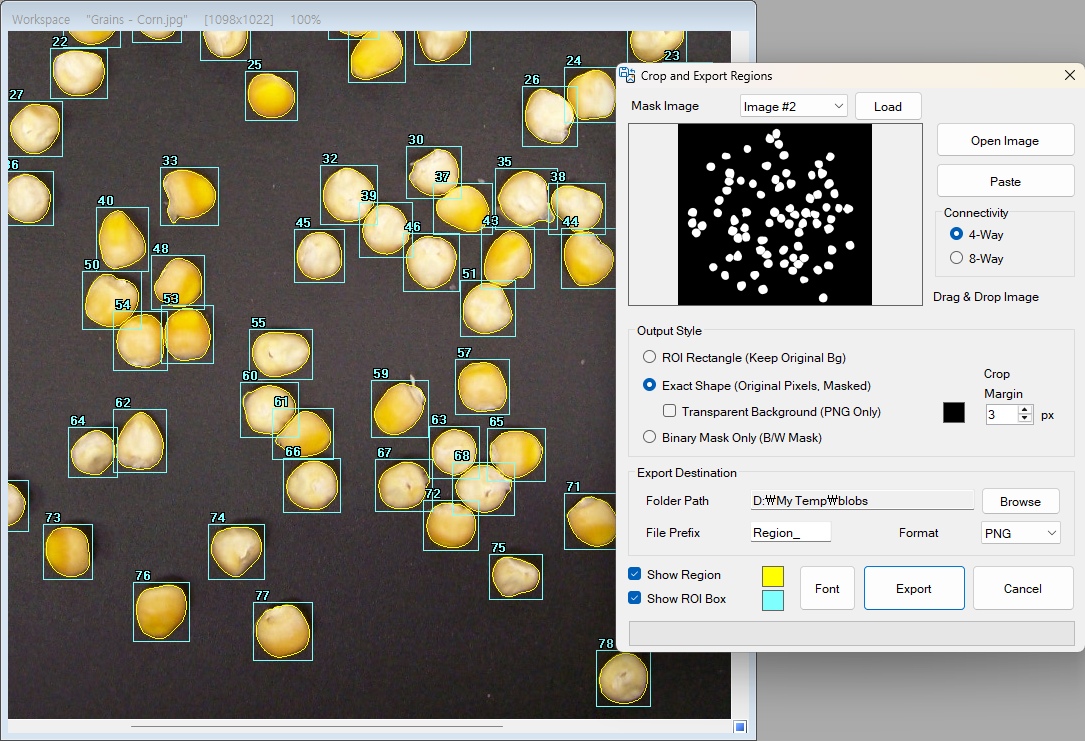
Below, you can see the intuitive setup interface where you can preview your boundaries and adjust export settings in real-time before generating your files.
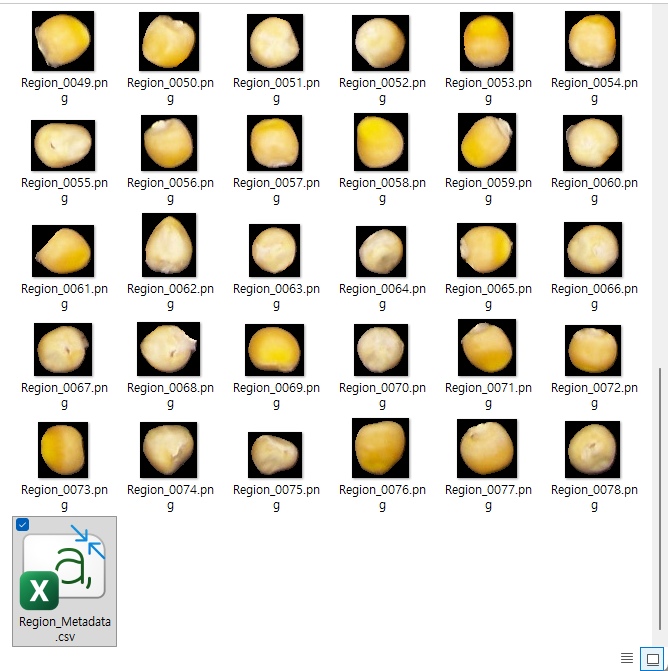
The image below shows the region (blob) files generated after exporting.
💡 Key Features
- Flexible Mask Loading: Load your binary mask easily via file browser, clipboard paste, image buffer, or a simple drag-and-drop. The tool even auto-resizes masks to match your workspace image automatically!
- Real-Time Visual Preview: Instantly visualize region boundaries and bounding boxes directly on your canvas. You can fully customize the boundary colors, bounding box colors, and ID fonts to ensure clear visibility.
- Versatile Output Modes: Choose exactly how your regions are extracted: export the Exact Shape, the rectangular ROI (Region of Interest), or the Binary mask of the object.
- Transparency & Background Control: When exporting exact shapes, you can easily enable a transparent background (automatically saving as PNG) or define a custom background color to suit your specific needs.
- Automated Batch Export: Add a custom padding margin, select your preferred image format (PNG, JPEG, BMP), set a file name prefix, and export all identified regions to your chosen folder in one click using high-speed parallel processing.
🛠️ How to Use the Crop and Export Regions Tool
Extracting multiple objects into individual files is incredibly straightforward. Just follow these steps:
Step 1: Load Your Binary Mask
Start by providing the binary mask that identifies your regions. You can open an image file, load it from the Image Buffer, paste it directly from your clipboard, or drag and drop a mask image into the preview area.
Step 2: Customize the Preview & Boundaries
Use the preview options to visualize the regions before exporting:
- Toggle Show Region Boundary and Show Bounding Box to see exactly what will be cropped.
- Click the color boxes to change the Region and Box colors, or click the Font button to adjust the Blob ID text.
- Adjust the Margin value to add extra padding space around your cropped objects.
Step 3: Configure Output Settings
Determine how your cropped regions should look when saved:
- Select your output mode: Output ROI (full rectangular area), Output Exact Shape (only the object itself), or Output Binary.
- If using Exact Shape, check Transparent Bg for a clean cutout, or click the Bg Color box to apply a solid background color.
- Choose your preferred Image Format (PNG, JPEG, or BMP).
Step 4: Export Your Regions
Click Browse to select your destination folder and type a File Prefix for your exported images. Once everything is set, hit the Export button. The progress bar will track the process, and all your regions will be instantly saved as individual files!
With the Crop and Export Regions tool, isolating and saving hundreds of specific image features is no longer a manual chore—it’s an automated, one-click process!