A Comprehensive Guide to Powerful Text Annotation in PhenoCapture
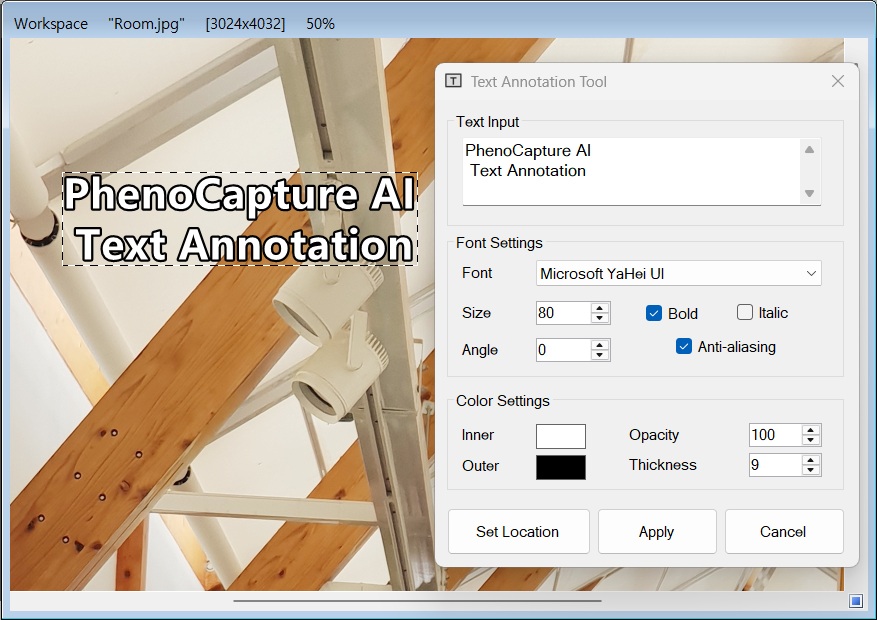
PhenoCapture AI offers a robust Text Annotation feature that allows you to effortlessly add labels, descriptions, and creative typography directly onto your photos and documents. Going beyond simple text input, it supports a variety of advanced formatting options designed to maximize readability and make your projects stand out, whether you are designing a presentation, marking up a scanned document, or adding captions to your photography.
In this post, we will explore the details of PhenoCapture AI’s text annotation capabilities and how you can make the most of them.
💡 Key Features
The text annotation tool is designed to give you complete freedom to customize the design of your text without needing a heavy graphic design program.
- Diverse Fonts and Styles: Utilize any font installed on your system. It fully supports basic formatting, including font size, Bold, and Italic styles, giving you total creative control.
- Anti-Aliasing: Smooths out the edges of your text, ensuring that characters remain crisp, clean, and unbroken even on high-resolution images or large canvas sizes.
- Customizable Thickness and Colors: You can independently set the Inner Color and Outer Color (outline) of your text. If you need to write over a busy background or a photo with similar colors, adjusting the outline thickness can significantly enhance readability.
- Precise Rotation (Angle): Freely rotate the text to any desired angle. This allows you to add natural-looking annotations that align perfectly with diagonal objects, architectural lines, or document margins. (Rotation pivots precisely from the bottom-left corner of the text box.)
- Opacity Control: Adjust the opacity of your text so you can overlay elegant watermarks or annotations without hiding crucial details in the original image.
🛠️ How to Use Text Annotation
Adding text to your images is a highly intuitive process. Just follow these simple steps:
Step 1: Enter Text and Configure Styles
First, open the text annotation settings window and type your desired text into the input field. Select your preferred font type and size, and click on the inner/outer color palettes to choose your colors. If necessary, adjust the outline thickness and opacity values to suit your image.
Step 2: Set Location on the Image
Once your text is configured, click the [Set Location] button. The mouse cursor in the main Workspace will change, indicating that you can now click anywhere on the image to specify where the text should be placed.
- Real-time Preview & Drag-and-Drop: Upon clicking, a dotted bounding box (Marching Ants) will appear. Before finalizing the placement, you can click and drag this bounding box to freely fine-tune the exact location.
- Zoom and Pan Support: Even if you have zoomed in or out of the viewport, you can accurately position your text without it interfering with mouse wheel zooming or panning features.
Step 3: Adjust Angle and Apply
If you need tilted text, try adjusting the Angle value in the settings window. You will see the bounding box rotate in real-time on your image. Once you are completely satisfied with the position and styling, click the [Apply] button to finalize and composite the text annotation onto your image.
(Tip: You can always cancel the operation before applying by simply clicking the [Cancel] button.)
By leveraging PhenoCapture AI’s text annotation features, you can easily add professional-level typography and labels to your images without ever needing a separate graphic editing program. Try applying it to your photos and projects today!