Mastering Advanced Sharpening in PhenoCapture AI
Whether you have a slightly out-of-focus photograph, a soft-looking scanned document, or an image that just needs a little extra “pop,” sharpening is an essential step in digital editing. However, basic sharpening tools often ruin images by making them look harsh or grainy.
PhenoCapture AI’s Advanced Sharpening feature gives you complete control over how edges and details are enhanced. By using a sophisticated algorithm, it allows you to selectively crisp up the important details without adding unwanted noise to smooth areas like skies, backgrounds, or skin tones.
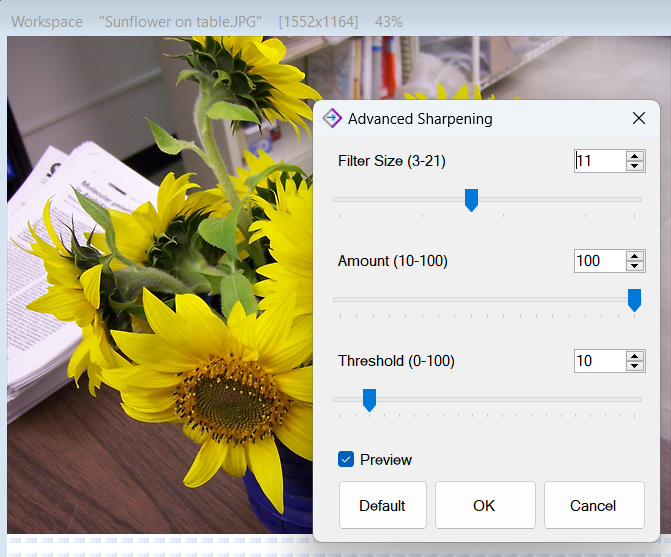
💡 Key Settings Explained
The Advanced Sharpening tool provides three simple but powerful controls to help you achieve the perfect level of clarity. You can easily adjust these by moving the sliders or typing specific values.
- Filter Size: This determines the radius or the width of the edges being sharpened.
- A smaller filter size is perfect for bringing out extremely fine, intricate details (like hair, fabric textures, or small text).
- A larger filter size works better for images with softer, wider edges, giving the overall picture a more pronounced definition.
- Amount (0 – 100%): This acts as the volume knob for your sharpening effect. Once you have determined the right Filter Size, use the Amount slider to decide how intensely the sharpening should be applied.
- Threshold: This is your safety net against noise. Sharpening can sometimes amplify unwanted grain in smooth areas. By increasing the Threshold, you tell PhenoCapture AI to ignore subtle variations (like background noise) and only sharpen actual, high-contrast edges. This ensures your subjects become beautifully crisp while smooth backgrounds remain perfectly clean.
🛠️ How to Use Advanced Sharpening
Thanks to PhenoCapture AI’s ultra-fast, zoom-aware preview engine, you can fine-tune your image instantly with zero interface delay.
Step 1: Enable the Live Preview
When you open the Advanced Sharpening tool, start by checking the Preview box. You can zoom in on specific parts of your image or pan around the workspace. The real-time preview will instantly update, showing you exactly how the sharpening affects the finest details of your image.
Step 2: Set Filter Size and Amount
Start by slightly increasing the Amount so the sharpening effect is clearly visible. Then, adjust the Filter Size until the edges look sharp but not unnaturally thick or glowing. Once the edge width feels right, dial the Amount slider back until the effect blends naturally into the photo.
Step 3: Adjust the Threshold for Clean Backgrounds
If you notice that smooth areas (such as clear skies, blank paper, or shadows) are becoming grainy, gradually increase the Threshold. Watch as the noise disappears from the flat areas while your main subjects remain perfectly sharp.
Step 4: Apply the Effect
If you want to start over at any point, you can click the [Default] button to reset the sliders back to their recommended starting values. Once you are thrilled with the crystal-clear result on your screen, simply click the [OK] button to finalize the enhancement.
(Tip: You can press the Enter key as a quick shortcut to apply the effect, or click [Cancel] to exit without making any changes to your original image.)
With PhenoCapture AI’s Advanced Sharpening, rescuing soft images and giving your photos a professional, high-definition finish takes just a few intuitive clicks!