⏱️ A Complete Guide to Time-Lapse Capture
PhenoCapture AI’s Time-Lapse Capture is an incredibly versatile tool designed to automatically record slow processes over time. Whether you want to monitor a 3D print, capture a blooming flower, record your computer screen during a long project, or set up a remote security feed, this feature handles it all with ease.
Here is everything you need to know about setting up and running your own time-lapse recordings securely and efficiently.
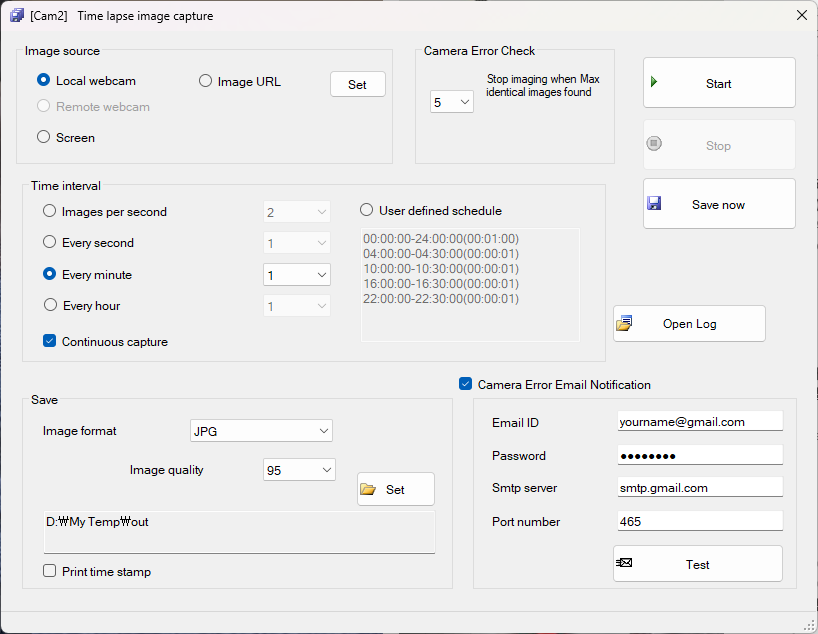
💡 Key Features
- Multiple Capture Sources: You are not limited to just a webcam. Capture images directly from a local camera, a remote camera URL, or even record your computer screen (either the entire monitor or a specific region).
- Highly Flexible Intervals: Choose the exact interval for your captures. Take multiple photos per second (IPS) for fast action, or take one photo every few seconds, minutes, or hours. You can even create a completely custom time schedule!
- Smart Error Detection & Alerts: You don’t have to worry about a disconnected or frozen camera filling up your hard drive with duplicate images. The tool automatically detects identical frozen frames and can immediately send you an Email Notification if an error occurs.
- Automatic Timestamps: Easily print the exact date and time onto every single frame as it is saved, making it perfect for scientific observation or security footage.
🛠️ How to Use Time-Lapse Capture
Setting up your automated time-lapse is straightforward. Just follow these simple steps:
Step 1: Choose Your Image Source
Select where you want to capture the images from. You can choose Local Cam, Remote Cam, Image URL, or Screen. If you choose Screen, you can capture the entire monitor or specify exact coordinates for a specific window.
Step 2: Set the Interval & Duration
Decide how often you want a picture taken by selecting your preferred interval (IPS, Seconds, Minutes, or Hours). Next, decide if you want the capture to run Continuously or if you want it to stop automatically after a set duration in minutes.
Step 3: Select the Destination
Choose the folder on your computer where the images will be saved and pick your preferred file format (like JPG or PNG). If you select JPG, you can also adjust the compression quality to save disk space during long recording sessions.
Step 4: Start Capturing!
Once your settings are configured, simply click Start. The software will begin automatically capturing and saving your images in the background. You can monitor the progress or click Stop at any time.
(Tip: Check the Print TimeStamp box if you want the exact capture time permanently stamped on the top corner of every photo!)
With the Time-Lapse Capture tool, automating long-term photography and system monitoring is completely effortless! Once you have successfully collected your images, you can easily combine them into a stunning, fluid movie file using PhenoCapture AI’s Video Encoder tool.
Check out this example of a time-lapse video created from captured images using our Video Encoder: