🧠 A Complete Guide to ML AI Image Classification
PhenoCapture AI’s ML Image Classification is a state-of-the-art, end-to-end Machine Learning suite built directly into your workflow. Whether you want to count specific types of cells, categorize manufacturing defects, or sort complex biological structures, this tool empowers you to train your own Artificial Intelligence to do the heavy lifting without writing a single line of code.
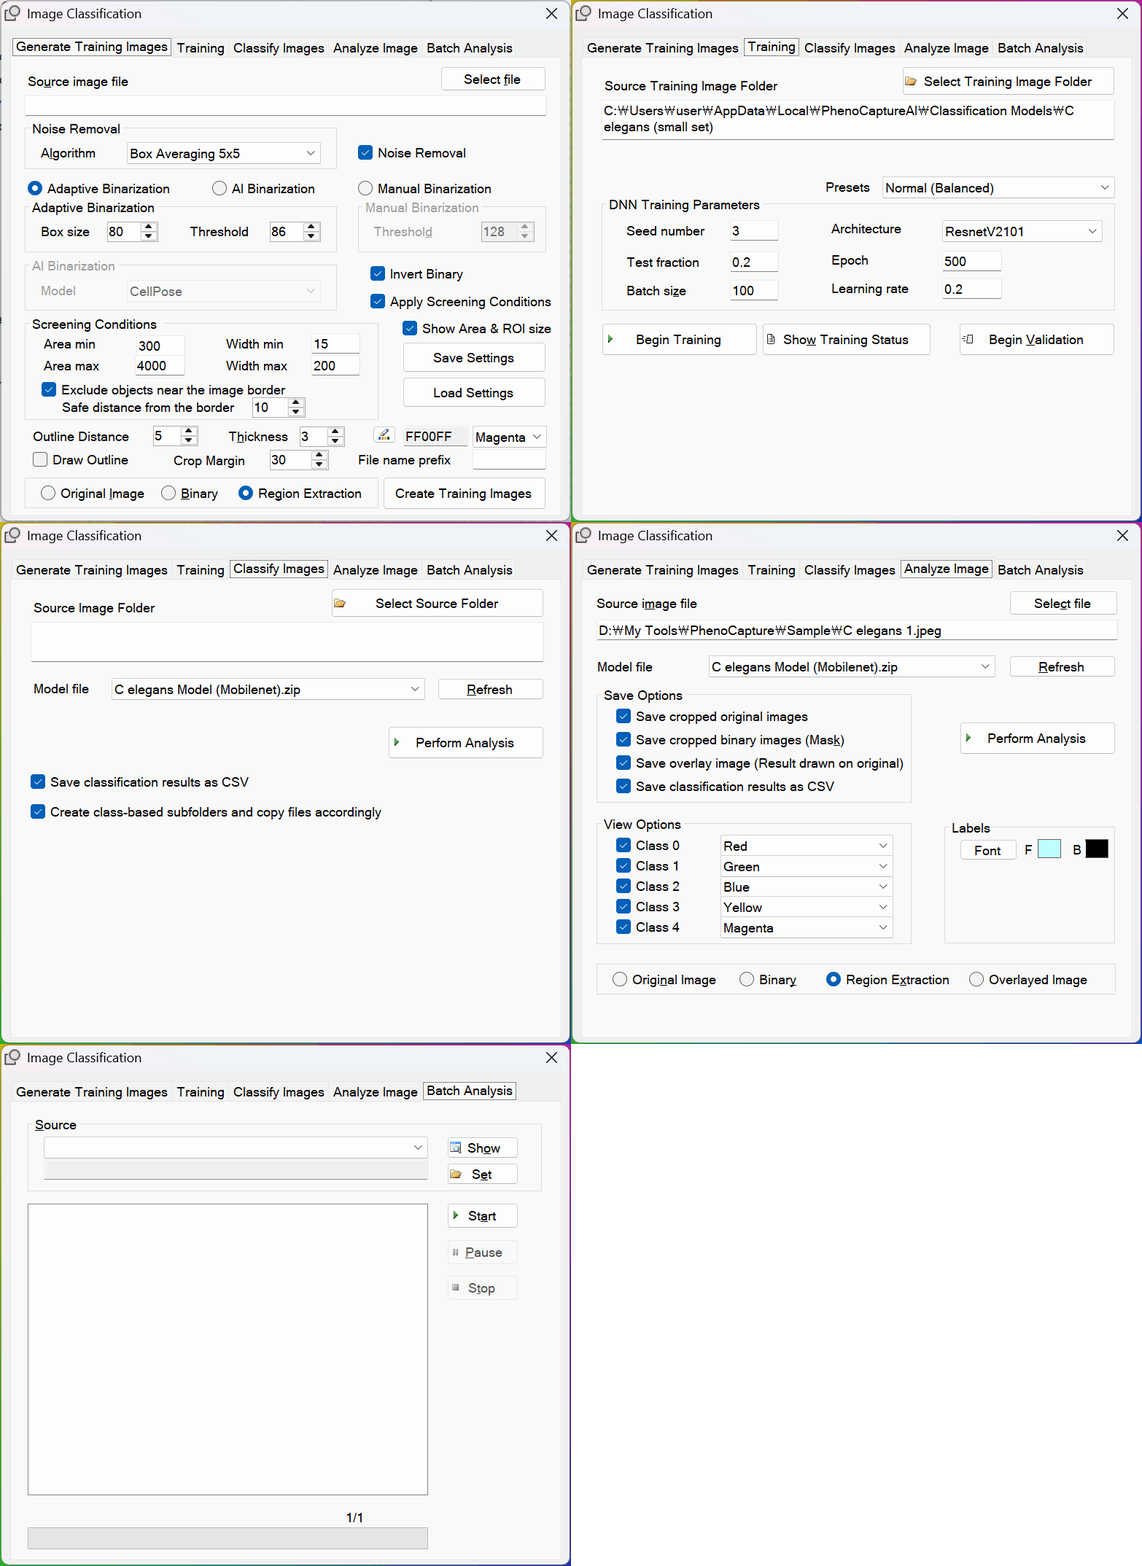
Here is everything you need to know to extract data, train a Deep Neural Network (DNN), and automatically classify your images using our comprehensive 5-step pipeline.
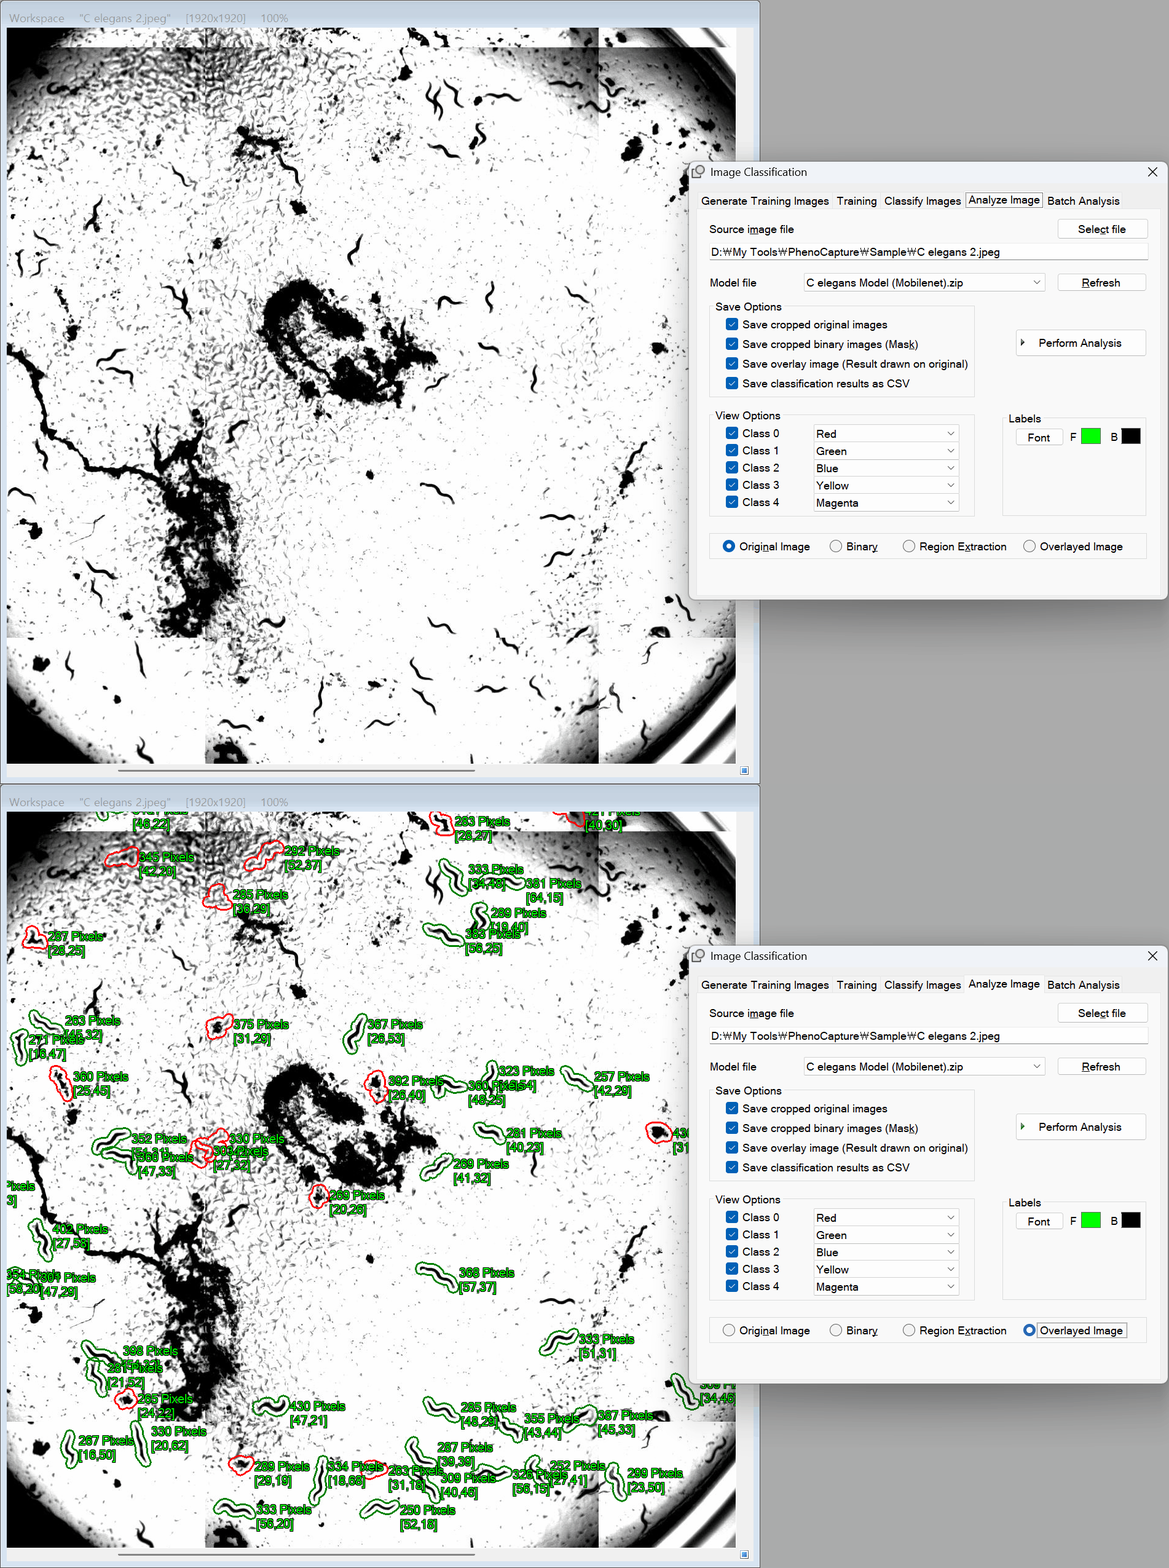
Note: Images obtained from an experimental project associated with the following publication:
Jung SK, Qu X, Aleman-Meza B, Wang T, Riepe C, Liu Z, Li Q, Zhong W. A multi-endpoint, high-throughput study of nanomaterial toxicity in Caenorhabditis elegans. Environmental Science & Technology. 2015 Feb 6;49(4):2477.
💡 Key Features
- Smart Data Extraction & Filtering: Easily generate a massive training dataset from a single image. Using advanced Binarization (Adaptive, Manual, or AI-driven like CellPose) and smart screening conditions (Area, Width, and Border exclusion), the tool automatically isolates target objects and saves them as neatly cropped images.
- 1-Click Training Presets: You don’t need a degree in data science! Choose from 7 pre-configured training presets—ranging from Ultra-Fast (Pipeline Test) for quick drafts to Maximum Accuracy for deep learning. The software automatically configures complex settings like Epochs, Batch Size, Learning Rate, and Model Architecture (ResNet, Inception, MobileNet).
- Automated Image Sorting (Classify Images): Classify entire folders of pre-cropped or individual images with a single click. The AI can automatically create subfolders named after their predicted classes, copy the images into them, and generate a comprehensive CSV summary report.
- Dynamic Visual Overlays: Running an analysis places beautiful, color-coded outlines around your objects. You can map up to 5 distinct classification categories (Class 0 to 4) to unique colors (Red, Green, Blue, Magenta, etc.) and toggle their visibility for instant visual verification.
- High-Speed Batch Processing: Have hundreds of large images to analyze and extract? Load them via the Workspace, File Manager, or a Custom Folder. Hit Start, and the AI will analyze every single blob sequentially, complete with Pause/Stop controls and a real-time progress log.
🛠️ How to Use ML Image Classification
The ML Image Classification tool is organized into five intuitive tabs. Follow this workflow to build and deploy your AI:
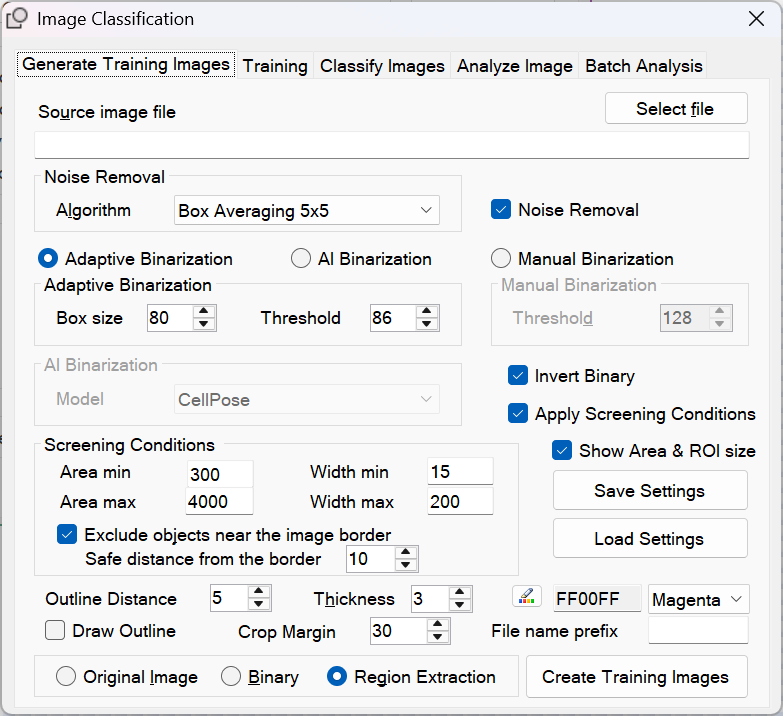
Phase 1: Generate Training Images (Data Preparation)
First, you need to isolate individual objects to teach the AI what to look for.
- Load Source Image: Select an image file to extract objects from. You can preview the original, binary, or extracted regions in real-time.
- Apply Binarization & Noise Removal: Choose how to separate objects from the background. You can use Manual Thresholding, Adaptive Binarization, or AI Binarization (CellPose). Use the built-in Noise Removal algorithms (Box Averaging or Gaussian Filter) to clean up artifacts.
- Set Screening Conditions: Filter out junk data! Define the Minimum/Maximum Area and Width, or check the box to Exclude objects near the image border so the AI only learns from perfect, complete shapes.
- Crop & Outline Settings: Define how much margin (padding) to include around the cropped object. You can even choose to draw an outline directly on the training images.
- Create Images: Click Create Training Images. The software will automatically crop out every valid object and save them into a folder. (Tip: Sort these cropped images into subfolders named ‘0’, ‘1’, ‘2’ to categorize them for Phase 2).
Phase 2: Perform Training
Once your dataset is sorted into category folders, it’s time to build the brain.
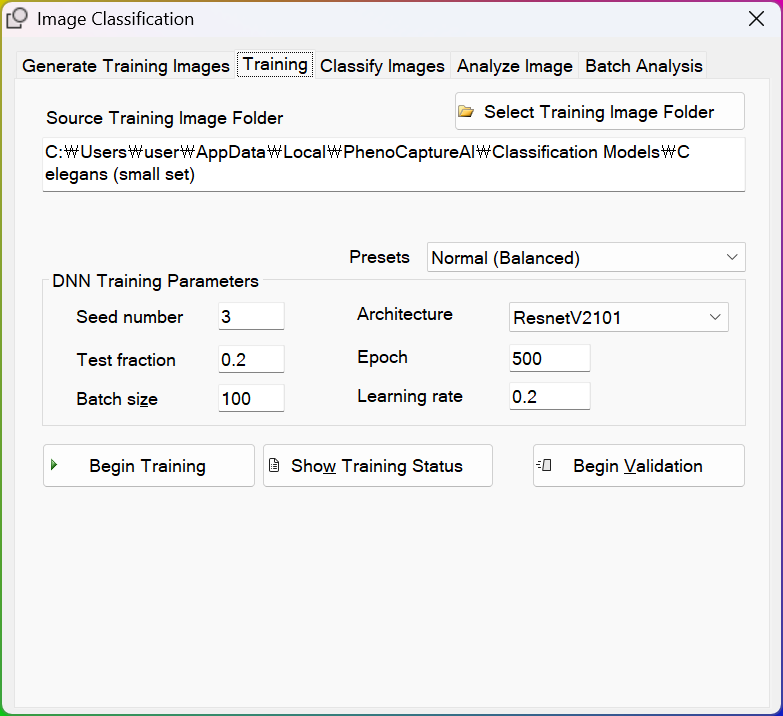
- Select Folder: Choose the main directory containing your categorized subfolders.
- Select a Training Preset: Choose a preset from the dropdown menu to auto-fill the DNN parameters:
- Ultra-Fast / Fast Training: Uses MobileNetV2 for rapid testing and pipeline verification.
- Normal (Balanced): Uses ResNetV250 with moderate epochs for a great balance of speed and accuracy.
- Deep Learning / Maximum Accuracy: Uses the heavy ResNetV2101 architecture with high epochs and a fine learning rate for massive datasets.
- Start Training: Click Begin Training. You can monitor the progress via the live status window. Upon completion, a
TrainedModel.zipfile is generated. - (Optional) Validation: Click Begin Validation to test your model’s accuracy on the training data. The software will output a
Validation.csvdetailing True/False Positives and Negatives!
Phase 3: Classify Images (Folder-Based Sorting)
If you already have individual images and want to categorize them into folders based on their content, use this feature.
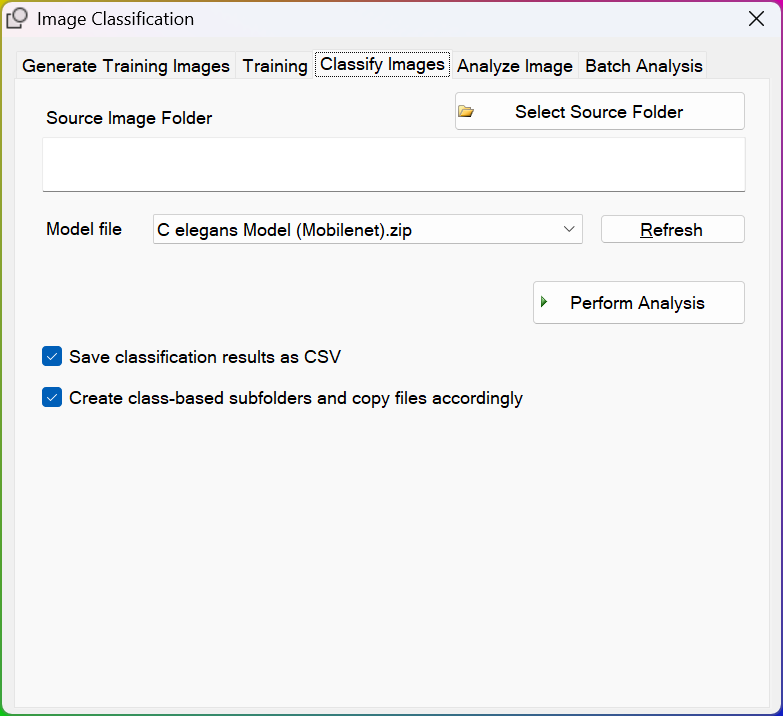
- Select Source Folder: Choose a directory containing the images you want to classify.
- Select Model: Pick your trained AI model from the dropdown list.
- Configure Output Options:
- Save classification results as CSV: When checked, the software generates a
ClassificationResults.csvfile mapping each filename to its predicted AI class. - Create class subfolders & copy images: When checked, the software automatically creates new subfolders named after the predicted classes (e.g., ‘0’, ‘1’, ‘Defect’) and copies each image into its respective folder.
- Save classification results as CSV: When checked, the software generates a
- Perform Analysis: Click the button to automatically sort and process all your images at once, safely in the background.
Phase 4: Conduct Analysis (Single Image Overlay)
Put your AI to work on a full-sized image and visualize the extraction and classification results simultaneously.
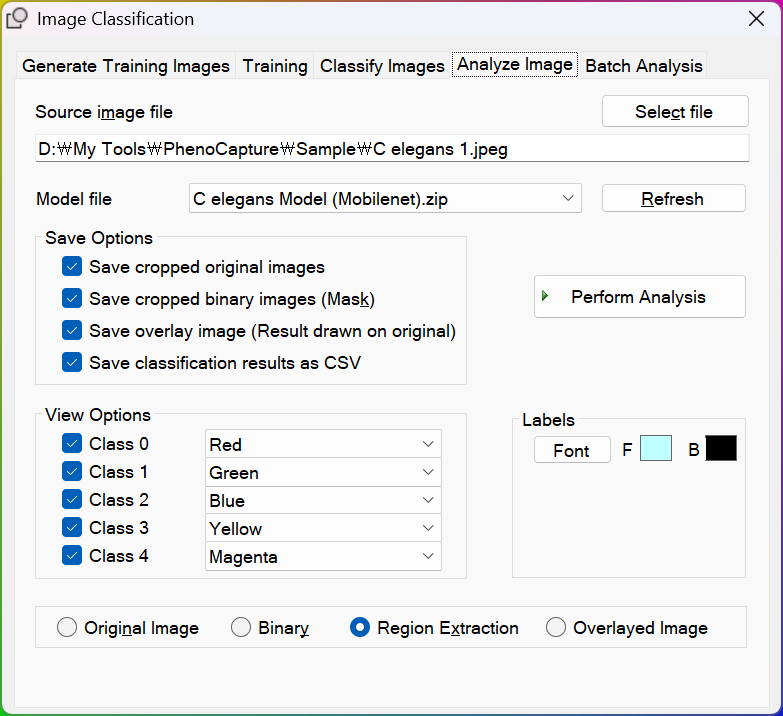
- Select Model & Image: Choose your freshly trained model from the dropdown list and load a new image to analyze.
- Configure Save Options: Check the boxes to save the classification results as a CSV, save the overlay image, or save the cropped original/binary blobs for further review.
- Set View Options: Map your AI’s predictions (Class 0 through Class 4) to specific colors (e.g., Class 0 = Red, Class 1 = Green). You can easily check/uncheck classes to hide them from the view.
- Perform Analysis: Click the button. The AI will detect, classify, and color-code every object. Turn on “Show Area & ROI size” to instantly see pixel measurements drawn directly on the image!
Phase 5: Batch Processing (Automation)
Need to extract and classify objects from an entire hard drive full of full-sized images? The Batch Processing tab handles it effortlessly.
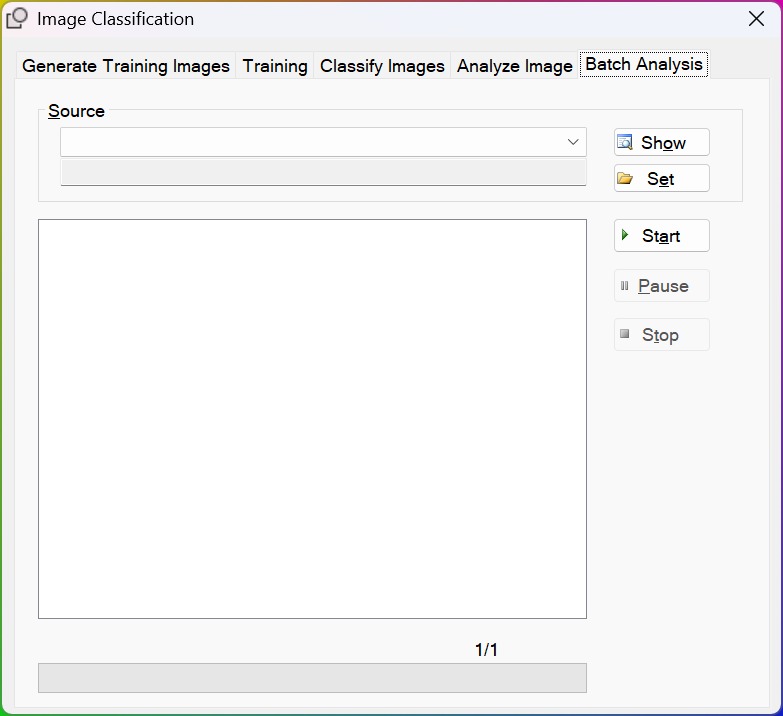
- Select Image Source: Choose where to pull images from—your current Workspace, a Drag & Drop box, the active File Manager folder, or any Custom Folder on your PC.
- Start the Queue: Click Start. The engine will sequentially process every image using the model and save options you configured in Phase 4.
- Monitor & Control: Watch the real-time progress bar and log window. You can Pause or Stop the batch operation at any time without losing the data that has already been processed.
With the ML Image Classification suite, building, validating, and deploying custom, highly accurate Artificial Intelligence is incredibly accessible and completely automated!