✨ Professional Color Correction with CIE L*a*b* & L*C*h° Adjustment
When editing photos, microscopy images, or scanned documents, simply turning up standard RGB brightness can wash out vibrant colors and make the image look unnatural. This happens because standard color tools mix brightness and color data together. PhenoCapture AI solves this problem with its dual-mode CIE L*a*b* & L*C*h° Color Adjustment feature.
Built on the human-vision-based CIE colorimetric standard, this tool completely separates image Lightness (L*) from chromatic color data. Furthermore, PhenoCapture AI lets you switch effortlessly between Cartesian L*a*b* Mode (for precise green–magenta and blue–yellow white balance) and polar L*C*h° Mode (for intuitive Chroma intensity and Hue angle control)—automatically translating values between both modes in real time!
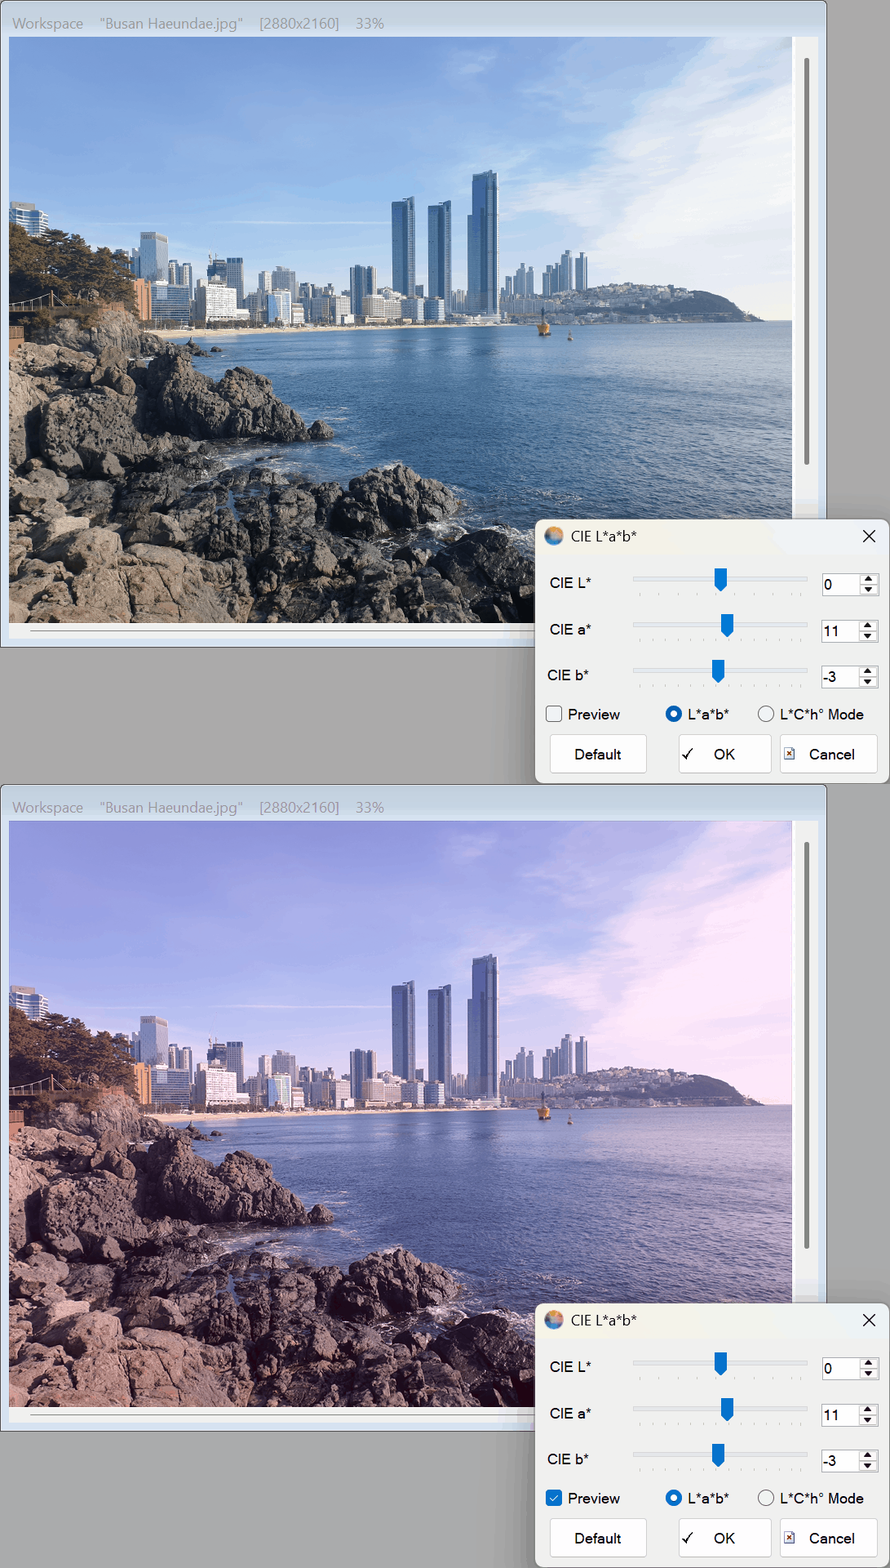
💡 Key Features
- Independent Lightness Control (CIE L*): Adjusting the L* slider (`-127` to `+127`) lets you make your image brighter or darker without shifting the hue or washing out color saturation. It is ideal for rescuing shadow details in underexposed photos safely.
- Dual-Mode Workflow (L*a*b* ↔ L*C*h°): Switch between two industry-standard control schemes with a single click:
- L*a*b* Mode (Opponent Axes): Directly fine-tune the CIE a* (Green–Magenta) and CIE b* (Blue–Yellow) axes (`-127` to `+127`) to neutralize lighting casts.
- L*C*h° Mode (Polar Coordinates): Control color using CIE C* (Chroma intensity: `0` to `127`) and CIE h° (Hue angle: `-180°` to `+180°`). When you switch back and forth, the sliders automatically convert and sync their exact mathematical positions!
- Real-Time Preview & ROI Mask Support: Powered by a multi-threaded preview engine, your workspace updates instantaneously as you drag the sliders—and strictly respects any active selection mask you have drawn.
- One-Click Reset: Clicking the Default button instantly resets all sliders back to zero (`0`), giving you a clean starting point at any time.
📐 How CIE L*a*b* and L*C*h° Work (Core Principles)
Unlike RGB—which is designed around how computer monitors emit light—CIE L*a*b* is designed around how the human eye and brain perceive color:
- 1. Perceptual Separation of Lightness and Color: The human retina processes brightness separately from color using opponent color channels. In CIE L*a*b*, L* represents pure perceptual lightness, while a* (Green `−` to Red/Magenta `+`) and b* (Blue `−` to Yellow `+`) form a 2D color plane.
- 2. Seamless Mathematical Link Between L*a*b* and L*C*h°: While `a*` and `b*` use X/Y grid coordinates, L*C*h° represents the exact same color plane using polar coordinates—Chroma (`C*`, distance from the center) and Hue Angle (`h°`, rotation angle):
C* = √(a*2 + b*2)|h° = atan2(b*, a*)Δa* = C* · cos(h°)|Δb* = C* · sin(h°)This means you can dial in a specific color direction using an intuitive angle (`h°`) and strength (`C*`), and PhenoCapture AI automatically resolves the exact `(Δa*, Δb*)` vectors under the hood!
🛠️ How to Use CIE L*a*b* & L*C*h° Adjustment
Achieving professional color correction is simple and intuitive:
Step 1: Fix the Lighting First (CIE L*)
Ensure the Preview checkbox is ticked, then start with the CIE L* slider. Drag it to the right to brighten dark shadows, or to the left to tone down overexposed highlights. Notice how your colors remain rich and natural even as the lighting changes!
Step 2: Choose Your Color Mode (L*a*b* or L*C*h°)
Select the mode that best fits your editing goal:
- Option A — Use L*a*b* Mode for White Balance & Cast Removal:
- If the image looks too green (e.g., fluorescent lighting) or too pink/magenta, gently adjust the CIE a* slider until the tint disappears.
- If the image looks too cold (blue shadows) or too warm (yellow tungsten light), adjust the CIE b* slider to restore a neutral look.
- Option B — Use L*C*h° Mode for Directional Color Grading:
- Select L*C*h° Mode, set your desired color intensity with CIE C*, and sweep the CIE h° angle slider (`-180°` to `+180°`) to smoothly rotate the color tone across the entire spectrum.
Step 3: Review and Apply
You can toggle between L*a*b* Mode and L*C*h° Mode at any time to inspect or fine-tune how your polar adjustments translate into `a*` and `b*` offsets. Once you are happy with the corrected result, click OK to apply the changes to your main workspace! (Need to extract individual L*, a*, or b* grayscale maps for scientific analysis instead? Check out our Complete Guide to Color Channel Splitting Tools!)
By leveraging the combined power of CIE L*a*b* and L*C*h° adjustments, you can achieve studio-quality color grading, white balance correction, and document enhancement in just a few clicks!