Effortless Background and Subject Separation with Color Range Selection
Whether you are trying to remove a solid background, isolate a specific object in a photograph, or extract text from a scanned document, selecting complex areas manually can be incredibly time-consuming. PhenoCapture AI’s Color Range Selection feature automates this process by allowing you to select areas based purely on their color.
Instead of drawing lines around an object, you simply pick a color, and the software instantly selects every matching pixel in the image. It is the perfect tool for graphic designers, photographers, and anyone who needs to quickly edit or replace specific colored regions.
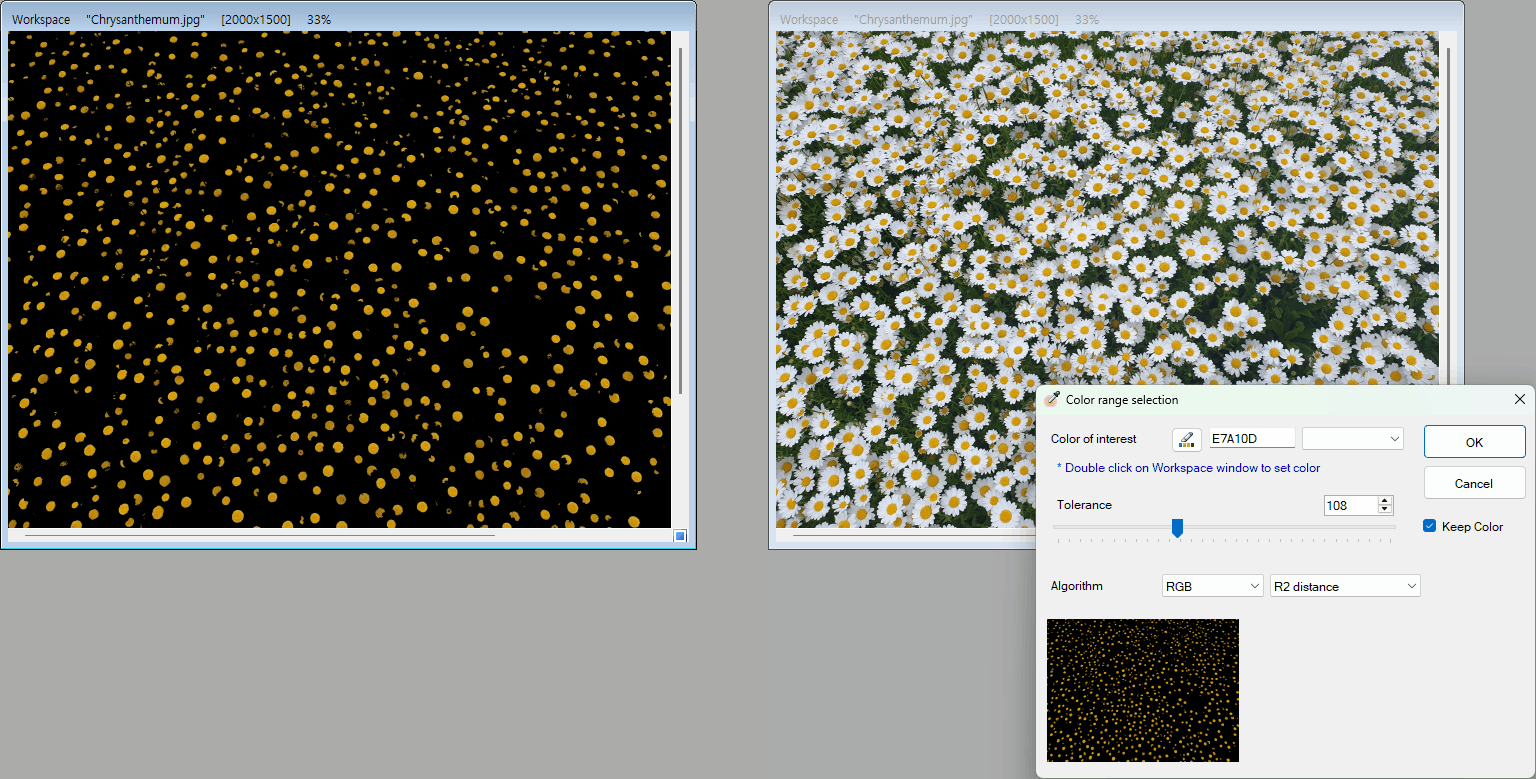
💡 Key Features
- Pinpoint Color Accuracy: Choose your target color using built-in presets (White, Black, Red, Green, Blue), entering a specific HEX code, or using the intuitive Color Picker to grab a color directly from your screen.
- Adjustable Tolerance: Not all backgrounds are perfectly uniform. The Tolerance slider lets you expand your selection to include slightly darker or lighter shades of your target color, ensuring smooth and natural edges.
- Real-Time Mask Preview: No guessing required. Thanks to PhenoCapture AI’s highly optimized engine, the preview window updates instantly as you adjust the tolerance, showing you exactly which parts of the image are being selected.
- Algorithm & Color Space Options: For advanced users, you can fine-tune how the software detects color matches by switching the detection algorithm or the underlying Color Space, giving you total control over complex lighting situations.
- Keep Original Color Option: Easily toggle whether you want to preserve the original color data or completely mask it out, depending on your editing goals.
🛠️ How to Use Color Range Selection
Using the Color Range tool is highly intuitive. Just follow these steps to isolate your desired subject:
Step 1: Pick Your Target Color
Open the Color Range Selection tool. You can click the Color Picker icon to sample a color directly from your image, or use the drop-down menu for quick presets.
Step 2: Adjust the Tolerance
Once your color is picked, look at the Preview window. If the selection is too strict and missing parts of your subject, slowly drag the Tolerance slider to the right. If it is selecting too much of the surrounding image, drag it to the left. The preview will update instantly to reflect your changes.
Step 3: Fine-Tune the Settings (Optional)
If your image has challenging lighting or shadows, try changing the Algorithm or Color Space dropdowns. These options change how PhenoCapture AI calculates color similarities and can often help cleanly separate subjects in difficult photos.
Step 4: Apply the Selection
Once the preview perfectly highlights the area you want to select, simply click OK. The selected color range will now be masked in your main workspace, ready for you to delete, recolor, or extract!
By mastering the Color Range Selection tool, you can drastically reduce the time spent on tedious manual masking and focus more on your creative editing and document processing tasks!