🖨️ A Complete Guide to Print & PDF
PhenoCapture AI’s Print & PDF tool gives you absolute control over how your images look on paper and in digital documents. Whether you need to print a microscopic scan at an exact physical scale, stretch a large photograph to fill a standard sheet, or export a publication-ready PDF with custom resolution and compression settings—even on a PC without a printer installed—this unified studio ensures flawless results every time.
Here is everything you need to know to create the perfect physical printout or high-precision PDF document from your image.
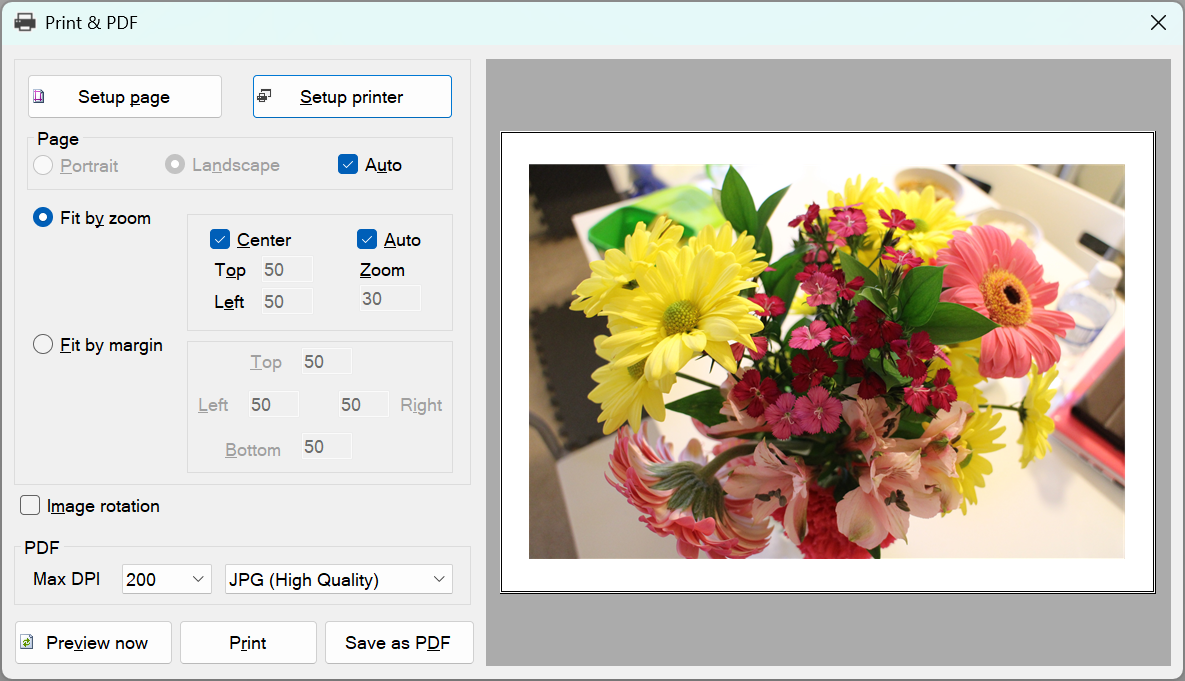
💡 Key Features
- Direct Save as PDF (No Printer Required): Export your exact page layout directly to a PDF file using the built-in rendering engine. You don’t need a physical printer or virtual PDF printer driver installed—PhenoCapture AI generates crisp, standard-compliant PDF documents natively.
- Smart Max PDF DPI Control: Optimize your PDF resolution for any workflow with selectable Max PDF DPI limits (96, 100, 150, 200, 300, 400, 500, or 600):
- No Artificial Upscaling: If your image’s effective resolution on the page is already lower than your selected Max DPI, the software preserves your original pixels without artificial stretching or file size bloat.
- Precision Downsampling: If a high-resolution image exceeds your selected Max DPI for the given print area, it is automatically downsampled using high-quality bicubic interpolation to keep your PDF file size compact and sharp.
- Flexible PDF Image Compression: Balance visual fidelity and file size by choosing how images are embedded inside your PDF:
- PNG: 100% lossless quality—ideal for sharp diagrams, text overlays, and line art.
- JPG (High Quality – Default): 95% quality compression—delivers near-lossless visual quality at a fraction of the file size.
- JPG (Mid / Low Quality): 90% and 80% quality options for lightweight email attachments and quick sharing.
- Smart Auto-Rotation: Never waste paper printing a wide image on a tall page again! By enabling Auto-Rotation, the software automatically detects your image’s proportions and switches the paper orientation (Portrait or Landscape) to provide the best possible fit.
- Dual Sizing Modes: You have total control over the scale and placement of your output:
- Fit by Margin (Fit to Page): Automatically scales and centers your image to perfectly fill the page based on the custom margins you set.
- Fit by Zoom (Actual Size): Allows you to output the image at a specific zoom percentage, auto-zoom, or center it on the page without stretching.
- Safe Real-Time Preview (Hardware & Software Fallback): The built-in preview window updates instantly as you change margins, orientation, or zoom levels. Even if no printer is installed on your system or the Windows Print Spooler is offline, PhenoCapture AI automatically switches to its built-in software preview canvas so you can still design layouts and export to PDF seamlessly.
- Non-Destructive Image Rotation: Need your image to face a specific direction on the page? Easily rotate the image 90 degrees clockwise or counter-clockwise just for the printout or PDF export, leaving your original workspace image completely untouched.
🛠️ How to Use the Print & PDF Tool
Getting the perfect printout or PDF document takes just a few simple steps:
Step 1: Printer and Page Setup
When you open the Print & PDF tool, click Setup printer to select your target printer, and Setup page to choose your paper size (such as A4 or Letter). The live preview will instantly update to match your paper dimensions. (Note: If no printer is installed on your PC, the tool automatically defaults to a standard A4 page layout so you can still preview and export to PDF!)
Step 2: Choose Your Orientation
Decide how the page should be oriented. You can manually select Portrait (tall) or Landscape (wide). For the easiest experience, simply keep the Auto checkbox enabled under Page settings and let the software automatically select the best orientation for your image!
Step 3: Select Your Sizing Mode
Choose how you want the image to be positioned on the page:
- To fill the whole page: Select Fit by margin. Enter your desired Top, Bottom, Left, and Right margins (e.g., 50), and the software will scale the image as large as possible within those boundaries without cutting off any edges.
- To control the exact scale: Select Fit by zoom. You can check Auto to fit automatically, manually type in a custom zoom percentage, or check Center to place the image perfectly in the middle of the page.
Step 4: Print or Save as PDF
Check the live preview window on the right to verify your margins and orientation. Once everything looks right, choose your output method:
- For a Physical Printout: Click the Print button to send the page directly to your printer.
- For a PDF Document: Select your preferred Max PDF DPI (default is 200) and compression format (JPG High/Mid/Low Quality or PNG), then click Save as PDF to generate a clean, accurately scaled PDF file in seconds.
With the Print & PDF tool, turning your digital workspace into perfectly scaled physical printouts or publication-ready PDF documents is completely effortless!